

A product tour is one of the best ways to:
- Create a compelling product story.
- Engage your target audience.
- Boost product adoption.
- Showcase your product in a way that matches your vision.
Therefore, not including them in your marketing and product adoption strategy could result in fewer conversions and higher churn rates—which you’re probably not too keen on.
In this guide, we’ll teach you how to create compelling product tours that let you tell your product story your way.
Let’s dive in!
TL;DR
- Product tours are interactive walkthroughs of your product that can help onboard new users, promote new functionality, and showcase your product to leads.
- Good product demos can improve retention rates, boost ROI and conversions, and provide smoother user onboarding experiences across levels, making them a must for modern SaaS companies.
- Arcade lets you build a successful product tour in just 6 steps and deploy it within minutes.
What is a product tour?
Let's quickly explain what the term means if you’re new to creating a product tour.
A product tour is an interactive guide or walkthrough that helps users understand and navigate a product's features and functionalities.
They are typically used in software and digital products to:
- Onboard new users and improve their experience.
- Showcase the product to prospective customers as part of marketing and pre-sales efforts.
- Educate existing users about new features.
- Help users make the most of more complex functionalities.
But why is this important for your business?
For starters, a good user onboarding experience can help retain customers. As many as 86% of people report that they’d be more likely to stay loyal to a brand if it provided good onboarding content.
Conversely, a poor user onboarding experience can result in high churn rates - in fact, it’s named the third most common reason for customers to churn.
This means that providing great onboarding that leaves no room for misunderstanding and constantly educating potential and existing users about your product’s capabilities and use cases can result in:
- More conversions.
- Higher user retention and more active users.
- An increase in ROI across levels.
How to create a guided product tour.
Now that we’ve cleared that up let’s get to the essential bit—a step-by-step guide to creating a guided product tour.
We’ll use Arcade, our interactive product tour solution, to explain all the steps and best practices, making the whole process much easier to understand.
Let’s begin!
Step 1: Create a product tour blueprint
Before you turn to Arcade to build your interactive demo, you must determine what you want to showcase and achieve with it.
Creating user onboarding product demos, product tours that pre-sales and marketing will use, and tours of specific features all have different objectives and target audiences, so it’s essential to know:
- What will you show?
- Who will you show it to?
That way, you’ll be able to create an amazing product tour that will resonate with the audience it’s aimed at.
Step 2: Record your product
Once you’ve decided on the type of product tour you’ll be creating, it’s time to start recording your product.
Unlike most other product tour software, Arcade has two options for recording:
- Chrome extension for recording web apps.
- Desktop app for recording other desktop apps, terminal apps, and multiple tabs and screens.
This way, you won’t have to use different solutions to record your product and create interactive product tours - you’ll be able to manage the entire process from Arcade alone.
Let’s get a closer look into how it all works.
Chrome extension
To start recording your product with the Chrome extension, you need to:
- Open the Chrome extension.
- Click the “Record interactive demo” button.
.png)
Once you do that, Arcade will start recording, capturing how you interact with your product - including all your clicks, scrolls, and typing - and save them as video snippets and screenshots.
Desktop app
The desktop app works pretty similar:
- Launch the app from your desktop.
- Choose between recording the entire screen or a specific app.
- Click the “Record interactive demo” button.
Create product demos manually.
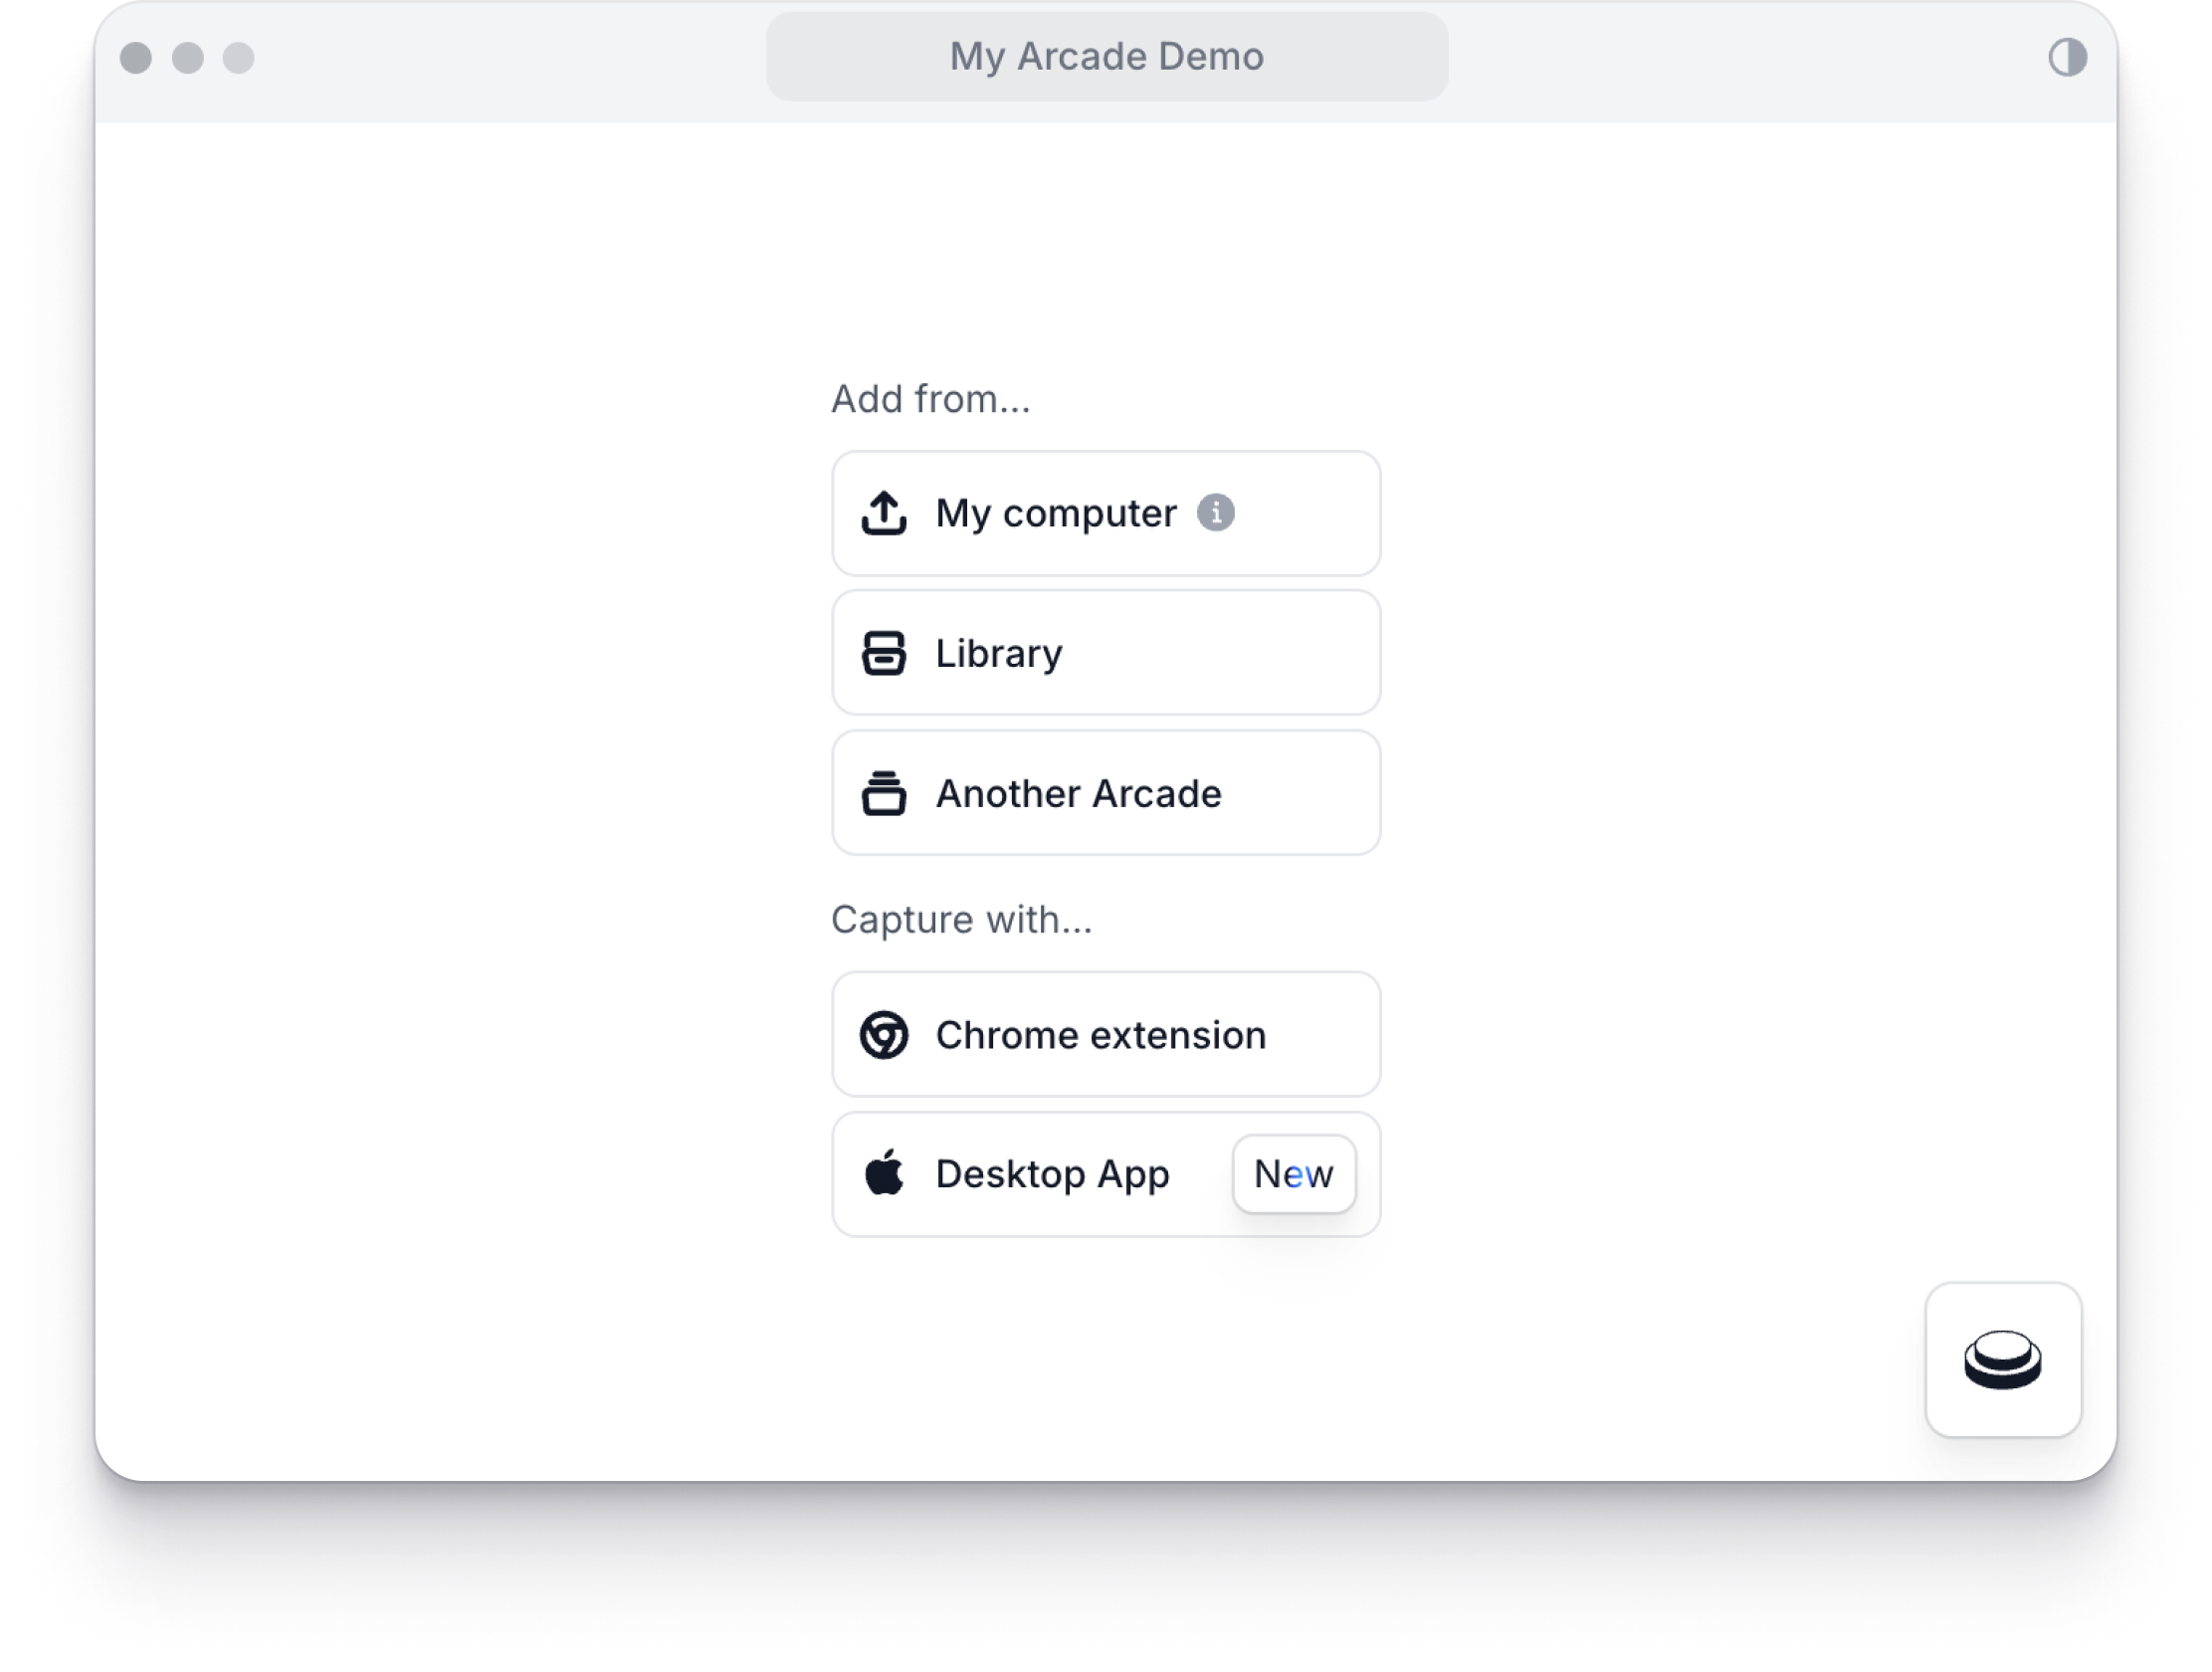
There’s one other option for creating product tours with Arcade.
If, for example, you have pre-made videos or images of your product, you can also use them to create captivating demos.
To manually create product tours:
- Go to the My Arcades page.
- Choose Create Arcade
- Click Upload Media and choose the videos and images you want to use.
Pro tip: If you have mobile apps you want to showcase through an interactive demo, Arcade can help with that, too.
Although the extension won’t work on your mobile, you can manually take screenshots and screen recordings of your mobile apps and then upload them to Arcade, as explained in the section on manual Arcades.
Step 3: Edit and customize your interactive product tour
Arcade lets you edit and customize your tours any way you see fit, enabling you to make compelling product stories tailored to your product and audience.
Once you’ve done recording, you'll be automatically taken to an upload page.
When the upload is complete, you can start editing (just make sure you're on the Edit tab).
From there, you can use a variety of options to customize your product tour, depending on the complexity of the tour and your intended goal, such as:
1. Create chapters
Chapters allow for segmenting your product tour for easier navigation and providing users with more context for each segment.
This way, you’ll set the scene for the feature you want to explain, a workflow that can help users achieve a particular goal, etc.
.png)
2. Add hotspots
Although Arcade will automatically create hotspots in every place you’ve clicked on, you can also add hotspots manually whenever you see fit.To do so, just double-click anywhere on the Edit page, and a hotspot will appear. If you change your mind, you can always delete hotspots within the hotspot editor.
To add text to the hotspot, click on it to open the editing modal to:
- Add text.
- Choose the hotspot and text colors.
- Select whether the hotspot text should open automatically or not, and more.
.png)
3. Add callouts
Callouts are another way to add text to your product tour. These are effective when you want to share context but don’t need to point to a specific place in your product. You can use them to provide additional information regarding a particular step, feature, etc.
Pro tip: You can hide hotspots and callouts when giving live product demos. That way, you will appear to be giving a real-time product demonstration rather than a pre-made interactive tour.
To do so, use the shortcut Command+Shift+D to hide hotspots and callouts. Then, use the shortcut again to have them appear again.
4. Choose Your Own Adventure
Essentially, this advanced branching option lets you add multiple steps to a chapter, each leading to a different outcome.
.png)
As a result, you can let users choose the part of the tour they want to engage with based on various criteria, such as:
- Their interests.
- Level of product understanding.
- Job roles and departments, and more.
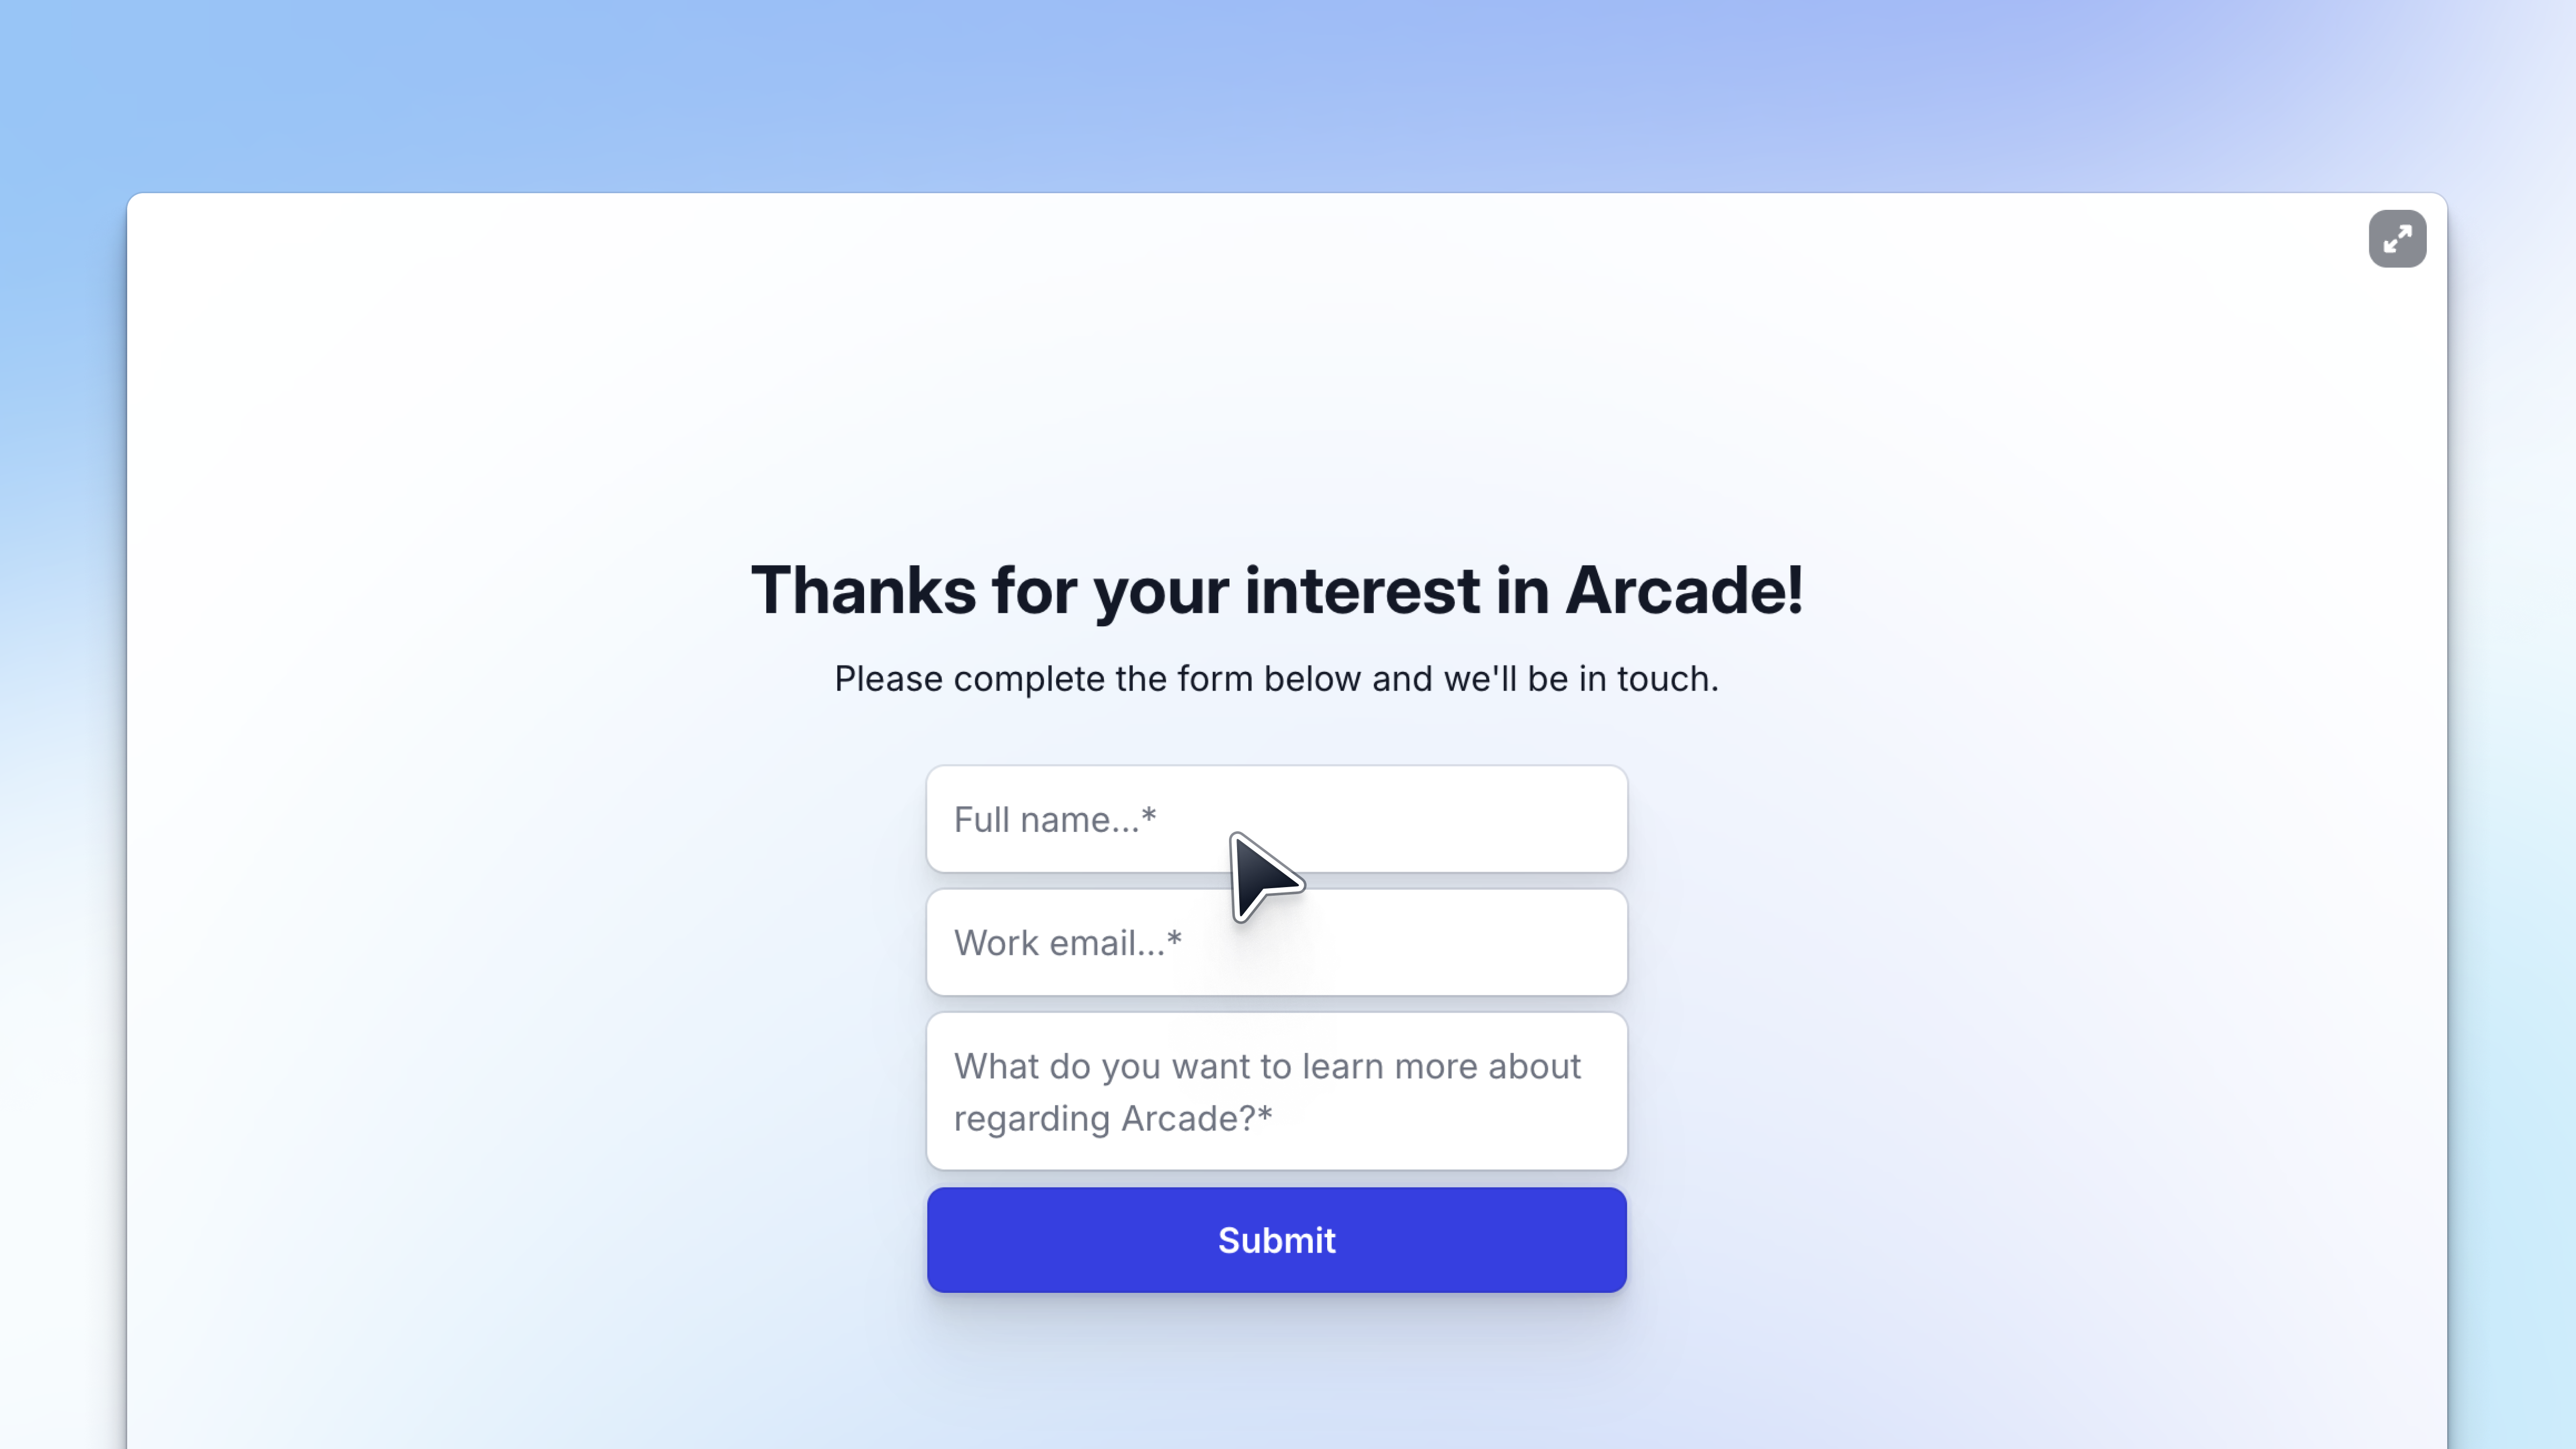
5. Add forms
You can add lead-capturing forms in your product tour to collect valuable information.To add forms, select the Form button from the right-side toolbar. A form chapter will appear on your tour. You can add various fields to your form and configure them to your liking by using a range of settings:
- Validation - Choose whether you'd like the answer to be an email, text string, multiple-choice, etc.
- Field name - This is an internal field that viewers do not see. It allows you to set the names for the columns that will be visible to you alone.
- Required - Whether or not a viewer can progress without this filled out.
- Settings - This is only shown when validation is set to email. It allows you to exclude generic emails (e.g., Gmail addresses) and only let company emails proceed.
6. Use Pan and Zoom to highlight crucial bits
Pan and Zoom feature is used to draw your audience’s attention to an especially important step, feature, or explanation.Select the Pan and Zoom tool from the toolbar to add it.
.png)
A zoom section will automatically be placed around your hotspot, and you can further adjust the size of this section to your liking. If you want to preview what the pan and zoom will look like, just click Preview. In addition to these editing options, Arcade lets you do tons of other stuff, including:
- Change the title of the tour.
- Delete and duplicate steps.
- Change the logo.
- Adjust colors and fonts.
- Add synthetic voiceovers and background music.
- And much more.
Step 4: Personalize your product demos to deliver unique customer experiences
Customers are sure to appreciate your going the extra mile to deliver tailored experiences, which is why Arcade includes options for personalizing every tour you make for individual users.
There are a few features you can use to personalize your product tours:
1. Custom links and variables
Custom variables are placeholders that turn specific text within your demo into templates.
These can include things like names, websites, company names, etc.
To create and configure them, you need to:
- Open Settings in your Arcade.
- Create as many variables as you need (to help you get started, we register the common first_name and company_name variables by default).
.png)
Once created, variables can be used in any text element inside a product tour, such as hotspots, callouts, chapter titles, chapter subtitles, chapter buttons, and the tour’s title and description.
At view time, these templates will be replaced with personalized values, such as the viewer’s first name, company name, etc.
Once you’ve set up your variables and edited your tour to ensure they appear in the right places, you can share the tour using two personalized links.
The process is similar for both:
#1 Open the Share menu.
#2 Navigate to the Custom Links tab.
#3 To share personalized links at scale:
• Go to the ‘Sharing this Arcade at scale?’ option.
• Choose between ‘Copy link template’ and ‘Copy embed template,’ depending on your needs.
• Replace placeholders in each query parameter of the link with your dynamic custom value to ensure your viewers see a demo custom-tailored to them.
#4 To share custom links for specific, high-touch viewers:
• Click the Create button in the Custom links tab.
• Give your link a recognizable name visible only to your team for better navigation.
• Provide the variable values you'd like to use for the viewer.
• Save your link.
• Click on Copy link next to the new entry and share it.
Try it out here. 👇
2. Page Morph
Page Morph allows you to edit any text on your page before recording. These edits will stay put even if you click or refresh the page. You can use Page Morph to remove sensitive customer data from the screen, quickly personalize a demo for a specific client, delete unnecessary parts and data to create a smoother demo, etc.To remove edits, navigate to the small popup at the bottom of the screen that says This domain has edits, click Edit, and then Reset all.
Step 5: Share or export your product demos
Once you’re satisfied with your work, it’s time to share your story with the world.
You can do that in several ways:
- Embed it on your website, landing page, or a specific app. Click the Share button and choose the channel you want to embed it on.
- Share links to your product tour via any channel of communication.
- Share entire collections of demos. This is useful when you have several related product tours you want to deliver to your users.
.png)
Try creating and sharing a collection here:
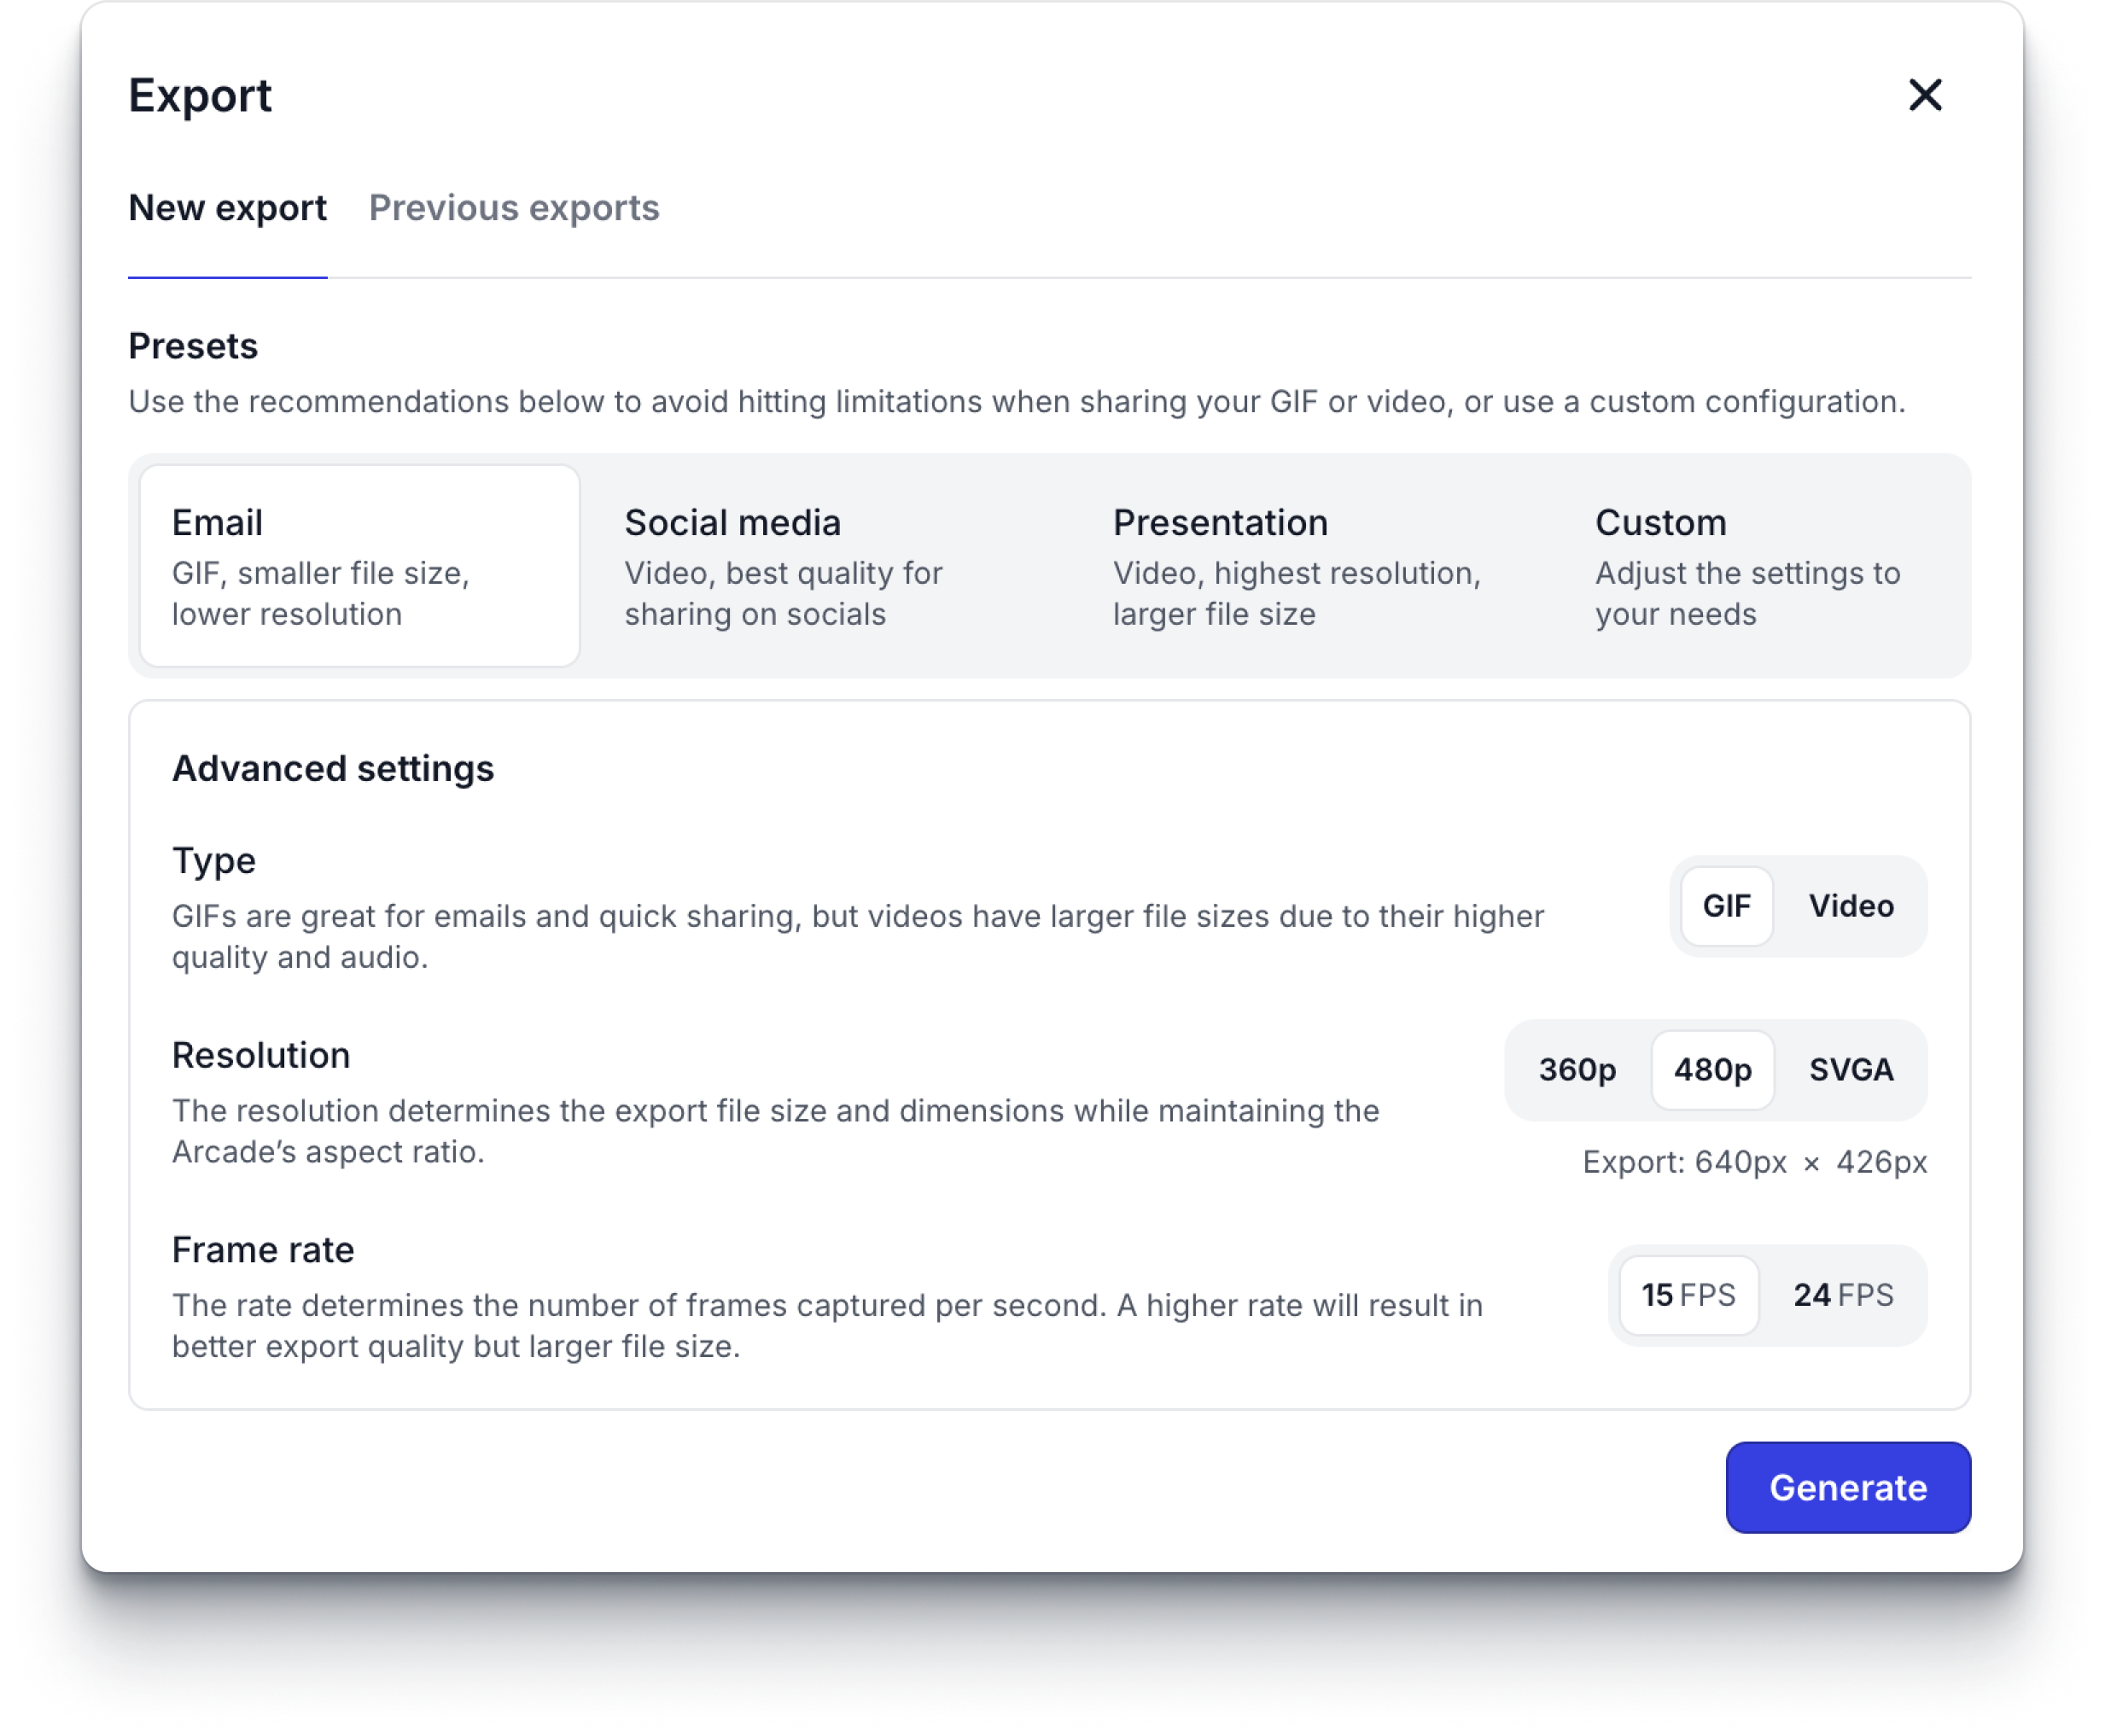
Finally, if you want to share your tours via email or social media platforms, you can export them as GIFs or videos.
To do so:
- Click on the Share button and select GIF or video downloads.
- Choose the resolution and frame rate for your export.
Step 6: Monitor performance
And now, time for the really exciting part - figuring out how successful your product tours were in engaging your audience and capturing hot new leads.
Once you go to the Insights page, you’ll access tons of actionable insights that enable you to drill down on demo engagement, including:
1. Form submissions
You’ll see all the leads who filled out the forms, including their names, companies, job roles, and other information you requested.
2. Individual demo performance
Besides getting a list of companies that viewed a specific tour, you’ll also get to see exactly how they engaged with it, including the branches they chose, CTAs they clicked, and other tours they have interacted with.
Finally, the Leads page lists all companies that engaged with some of your tours.
There, you’ll see all the companies that viewed your tours, including the time they accessed them and other insights into their interactions.
What are the benefits of using product tours?
Although we mentioned some of the major benefits of using product tours above, it’s worth considering others.
Better user onboarding experience
Interactive product tours can greatly improve user onboarding by enabling new customers to experience your product through both a guided walkthrough and an immersive experience.
Product tours guide users through a product's essential features and functionalities, significantly reducing the learning curve, shortening time-to-value, and increasing user satisfaction.
Increased product adoption and usage
Interactive product tours can help increase customer engagement and product adoption by highlighting your product’s key features and showcasing its value from the get-go.
Namely, users are more likely to explore and use your product’s more advanced features when they receive clear, interactive guidance.
In turn, you’ll get better overall retention, as you’ll encourage users to stay loyal to your brand.
Improving lead generation
Finally, you can use product tours as part of your marketing strategy. In fact, interactive content can double your conversions, as today’s customers appreciate getting the chance to test the waters before subscribing.
Enabling your leads to get the hang of your product through a guided tour tailored to their needs, interests, job roles, and more is sure to leave them with a good aftertaste of it, driving more conversions and boosting your ROI.
Create your own product tour within minutes with Arcade
And there you have it - all you need to know to create your first product tour.
Arcade makes the entire process as simple as possible thanks to its intuitive interface and features designed to let you create a visually polished and compelling product tour.
In fact, the average median publishing time for Arcade interactive tours is just 6 minutes!
Find it hard to believe?
Sign up for Arcade’s free plan and discover how easy it is to build engaging product tours in no time.
Stat source 1 (86% of people): https://www.wyzowl.com/onboarding-user-retention/
Stat source 2: https://www.precursive.com/customer-onboarding-2021-report
Share on


